
JEWELED DRAGON
Concept art:
The first picture on the right is the initial Photoshop document where I tweaked colors, concepts, and ornaments to find a color palette and general aesthetic that I liked enough to become the foundation of my project. The sketch below is a drawing I created to base out the dragon's pose. It also helped me workshop the wings and antlers a bit more, since I liked the idea of them but disliked how they were incorporated into the first concept art. I also added another set of legs because I wanted the body to have that dramatic curve with the back legs up and the front legs braced on the ground, but I also wanted the front arms to emote.


 |  |
|---|---|
 |  |
As you can see, a few aspects changed from the concept art to the initial model. For one, I tried to emphasize the curviness and flow of the neck, antlers, wings, etc. I also made some of the extremities smaller in order to introduce a dainty quality to the dragon.
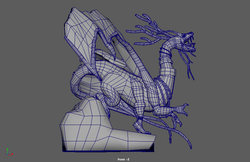
Low-poly model
in Maya:
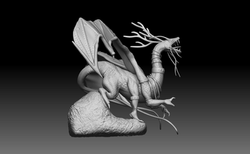
ZBrush Sculpting Process:
After smoothing the model in Maya and editing the UVs, I brought the model into ZBrush. I began by sculpting the dragon's muscles. Then I used a scale alpha brush to create a scale texture. I also defined details in the claws, fangs, mouth, etc.


Then I went into the wings and sculpted the raised boning. I also put in the gemstones and a leathery texture.
Final ZBrush Sculpt:
 |  |  |
|---|---|---|
 |
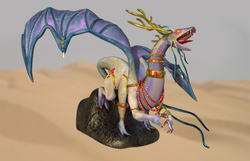
Texturing in Substance Painter:
Once the ZBrush sculpt was done, I used Substance Painter to bake it onto the low-poly model (the smoothed Maya version with the finished UVs). Then I used Substance Painter to texture everything. I exported the texture maps and plugged them into my Arnold Standard Surface shaders so that I could render in Arnold.


Breakdown of texture maps:
BASE COLOR

METALNESS

ROUGHNESS

NORMAL

Finished Renders:
 |  |  |
|---|---|---|
 |  |